
DIY Streetlight-Style Security Lamps for Your Home
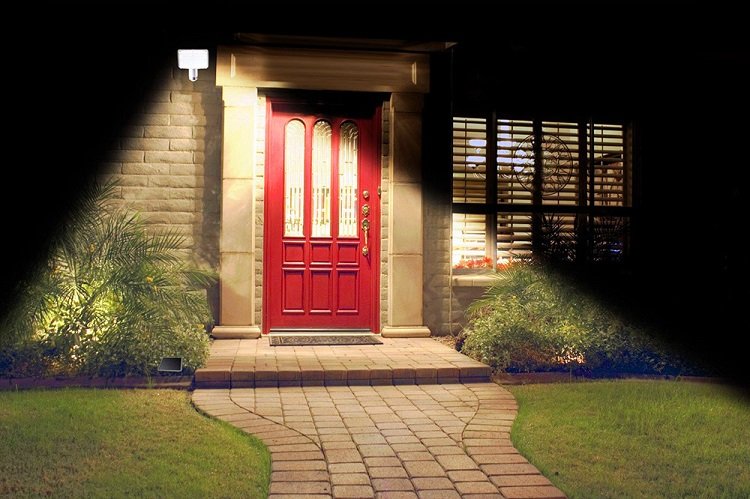
Streetlight-style security lamps are all the rage right now among suburban real estate owners. Not only do these lamps contribute to the overall aesthetics of your home’s exterior, but they are also incredibly functional. We all know that adequate lighting is a simple yet very effective deterrent against burglars and home invaders, and these streetlight-style lamps certainly do provide the ample lighting that your property requires. Best of all, these lamps work in such a way that they automatically turn on by themselves at dusk and turn off by sunrise. And did we mention that it won’t cost you an arm and a leg?
Why DIY?
 The good news is that installing these amazing light fixtures directly onto the house or building is something that the dedicated DIY-er can do by themselves easily. This makes for a great weekend project and will take an average of six hours to complete. All you need—skills-wise—are basic wiring knowledge, excellent balancing skills (so you do not fall off that ladder), and a lot of courage. The tools you will need include screwdriver, pliers, drill and bit, wrench, wire cutters, wire strippers, voltage tester, and fish tape. You will also be needing the following materials: conduit, street light lamp, conduit wire (in black, white, and green), wire nuts, electrician’s tape, and pulling lubricant. These will set you back no more than a few dollars, so really, it is an incredibly affordable project with amazingly worthwhile results. So let’s get started.
Step by step
1. Before you start fishing the wires, make sure to install the conduit completely. You might argue that it is a lot easier and less time-consuming to piece the conduit together as you run the wires, but it is actually a lot easier and safer to do it this way. This ensures that you do not end up pinching any of the wires while installing the conduit.
2. Using the template that comes with the streetlight lamp, lay out the holes for the mounting screws and mark them. This makes drilling the holes for the mounting bolts a lot easier and significantly more accurate.
3. Drive in the two bottom mounting screws. Do not install them all the way in, however, so you have enough room to slide in the fixture over them easily. You can also install the top screw at this point, but make sure to drive it back out. This way, it will be easier to install that top screw later.
4. Usually, the sensor that turns the lamp on and off is a separate assembly. Install it as per the manufacturer’s instructions. Make sure to read through the accompanying literature carefully to do it right. Better yet, it’s a good idea to make sure beforehand that this assembly is compatible with the rest of your components.
5. Before you hang the light, you have to connect the incoming wiring to the light in the built-in junction box located between the mounting bracket and the light itself. You can then install the conduit connector at the back prior to hanging the light.
 6. A conduit can now be run between the junction box that will provide the lamp’s power and the lamp’s conduit connector. Put in fish tape from the lamp to the junction box, then attach the wires to the tape. Use pulling lubricant to easily pull the wires up, all the way through the conduit.
7. The conduit’s ground wire can now be attached straight to the lamp’s ground screw in green. Again, pull these wires into the junction box. Adequately strip the white wire, enough to easily twist them together, then use the wire nut to cover these. Do the same with the black wires. You can then wrap each wire by color with electrician’s tape.
8. At this point, you can now close the junction box, attach the streetlight lamp’s reflector, and install the bulb.
Et voila! You now have a streetlight-style lamp to protect and prettify your home, which is not only functional but also adds to the overall aesthetics of your home. Best of all, by undertaking such a simple and affordable project, you not only increase the overall value of your real estate property, but you also increase its security and, by extension, your family’s well-being.
More inReal Estate & Mortgage
-
 Tech Giant Cisco Likely to Lay Off ‘Almost 350’ Employees As Part of Its ‘Restructuring Plan’
Is your favorite tech company feeling the pinch? Recent reports suggest that Cisco (CSCO) is planning to lay off ‘almost 350...
May 31, 2024 -
 How Many Mortgages Can You Have? Understanding the Limits
Are you pondering the idea of delving into the realm of multiple mortgages? Whether it’s for expanding your property portfolio, securing...
May 23, 2024 -
 What You Ought to Know About Dominican Republic Rum
When you think of the Dominican Republic, your mind might drift to images of beautiful beaches and vibrant dance rhythms. But...
May 16, 2024 -
 Are Mobile Homes Worth Investing? A Deeper Look
Are mobile homes a good investment? This question often pops up among potential homeowners and investors alike, looking for an affordable...
May 9, 2024 -
 10 Best Stocks to Invest in 2024 for Smart Investors
In a world where economic growth seems to be hitting the brakes, the hunt for the best stocks to invest in...
April 30, 2024 -
 Will Breaking a Lease Affect Your Credit? The Real Impact
Breaking a lease isn’t just about packing up and moving on; it’s a decision that can have lasting financial implications. While...
April 23, 2024 -
 Is Traveling a Hobby? Exploring the Reasons and Ways to Travel More
Have you ever scrolled through social media and stumbled upon the question, “Is traveling a hobby?” It’s a thought-provoking query that...
April 16, 2024 -
 Who Owns the Playboy Mansion? Revealing the Current Owner
The story of the Playboy Mansion is as intriguing as the parties it once hosted. Nestled in the heart of Los...
April 9, 2024 -
 Hotel Housekeeping Tips & Tricks – Ensure a Fresh & Inviting Space
Hotel housekeeping is a crucial aspect of hospitality management, ensuring that guests are greeted with clean and comfortable accommodations. As a...
April 1, 2024
More From TheFinancialMag
-
 7 Best Things to Do in Kavala for an Unforgettable Experience
Kavala, a coastal gem in northern Greece, is a city that captivates with its rich cultural heritage, scenic beauty, and vibrant...
LifestyleOctober 17, 2024 -
 Money Management in Your 20s – Become a Financial Pro
Entering your 20s often feels like a whirlwind of experiences and opportunities. As individuals transition from college life to the working...
Financial AdvisoryOctober 10, 2024 -
 What Is a High-Yield Account and How Does It Work?
In today’s financial landscape, savvy savers are turning to high-yield accounts as a powerful tool to grow their money. These accounts...
Trade & MarketsOctober 3, 2024 -
 Mortgage Rates at 18 Month Low – What’s Next After the Fed Meeting?
In a surprising turn of events, mortgage rates 18 month low has become a major topic of discussion, as rates have...
Real Estate & MortgageSeptember 25, 2024 -
 40 Best Date Night Ideas for Every Couple
Are you tired of the same old dinner and movie routine? It’s time to shake things up and reignite that spark...
LifestyleSeptember 20, 2024
You must be logged in to post a comment Login